You should now have 3 nifskope windows open, one for each object. 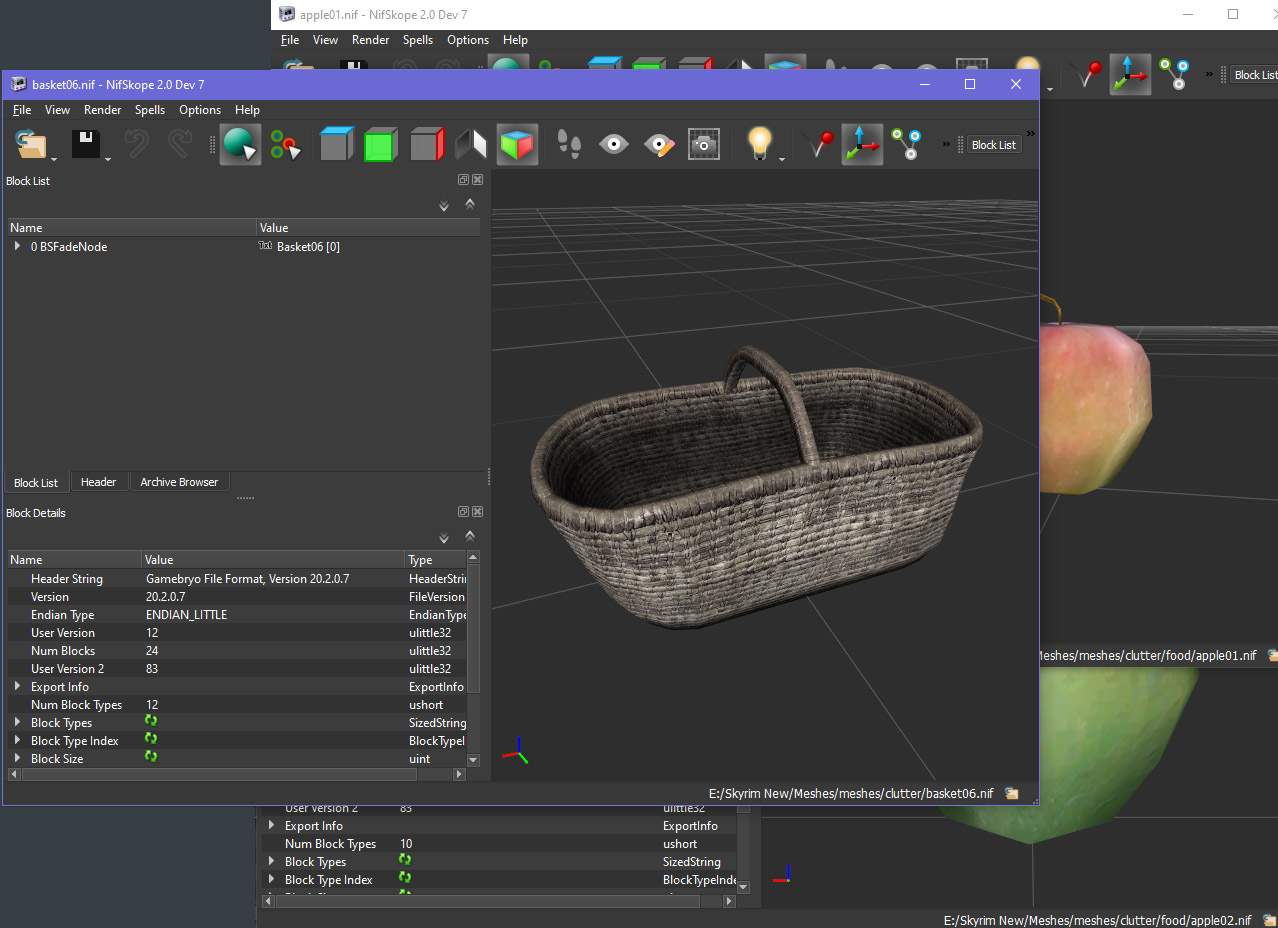
2. Combining Objects
- Open the apple01.nif window.
- In the left side panel, you’ll find the heading “0 BSFadeNode”. Click the arrow next to it to expand the tree structure of the nif.
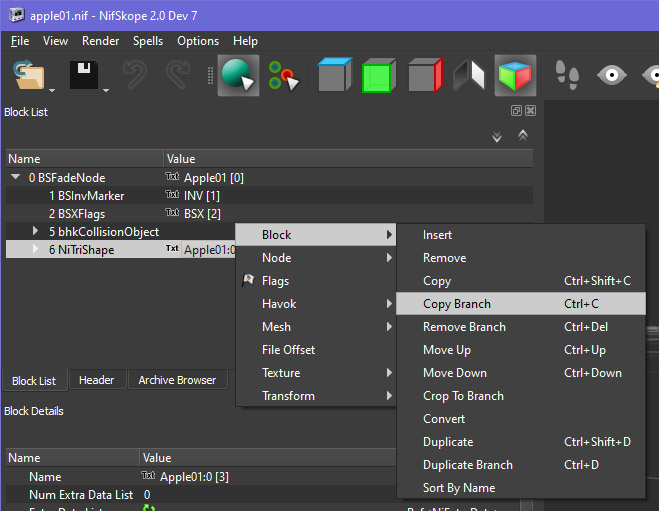
You’ll see several different branches, but the one we’re interested in is the one that contains the geometry of the apple: the NiTriShape named Apple01.
- Right click it, hover over “Block”, then click “Copy Branch” from the expanded menu. You can also do this with shortcuts by pressing CTRL+C.
- Go back to the basket nif that we previously opened.
- Click on the BSFadeNode at the top of the left panel, right click, hover over the Block menu again, and then click “Paste Branch” or press CTRL+V.

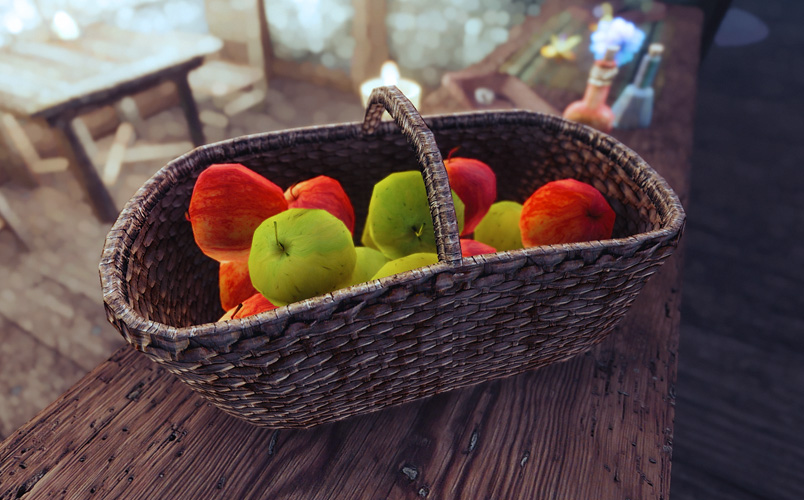
Your apple should now be conveniently placed in the center of the basket.
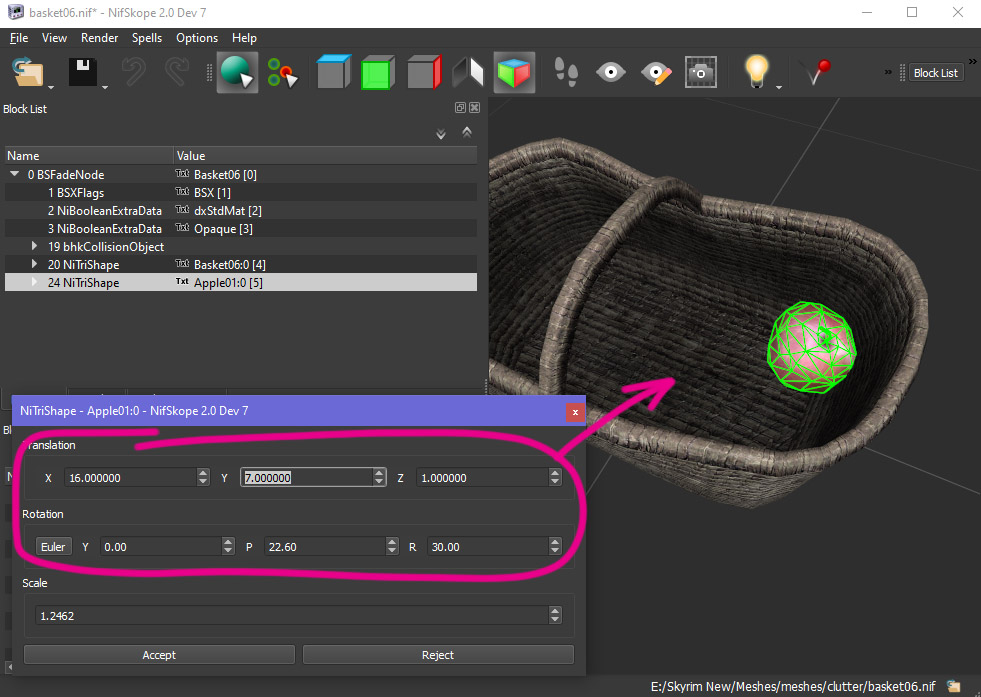
3. Moving and Positioning Your Object
In order to make this basket look more natural, we don’t want an apple just sitting in it, upright and perfectly centered, so we’re going to adjust its positioning a bit.
- Right click on the apple NiTriShape that you just pasted, hover over “Transform” and then click “Edit” on the expanded menu.
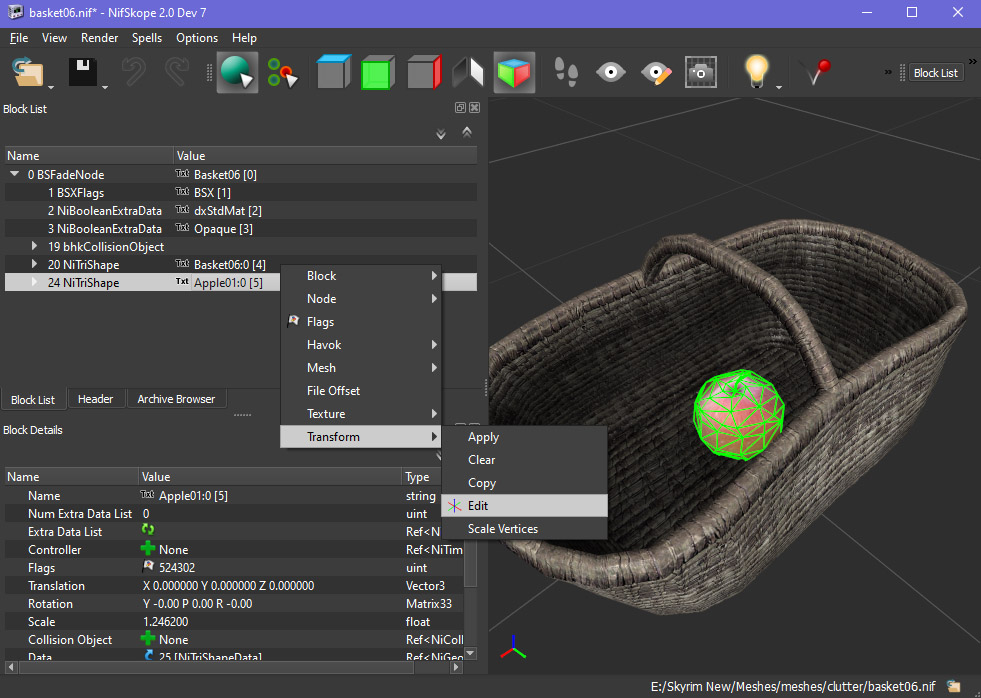
A new window will pop up with lots of options for transforming your apple.
Translation
These parameters adjust where your mesh appears in 3d space. Typically, X will move your item side-to-side, Y will move it back and forth, and Z will move it up and down. However, it’s not always quite so straightforward, especially once you start rotating the object, so you can always use the colorful reference in the nif preview window to orient yourself – the blue line will always represent the Z axis, the red line represents the X axis, and the green line represents the Y axis.
Rotation
These options affect the orientation of your object on its own axis, allowing you to tilt and turn the object without moving it from its current location. These are excellent for giving your items a more naturally placed/settled look.
Scale
The size of your object. For most items, 1.0 is the default, with lower values give smaller sizes and higher values giving larger sizes. These are based on percentages of the original mesh, so 0.9 will be 90% of the original size, and 1.2 will be 120%, etc. (Interestingly, the vanilla apple is already scaled up slightly.)
I’m going to tweak these values a bit to move the apple to the side of the basket (to allow room for more apples) tilt it a bit so it rests against the wall of the basket, and rotate it to ensure our apples don’t look too fake/uniform when we’ve got a bunch of them.
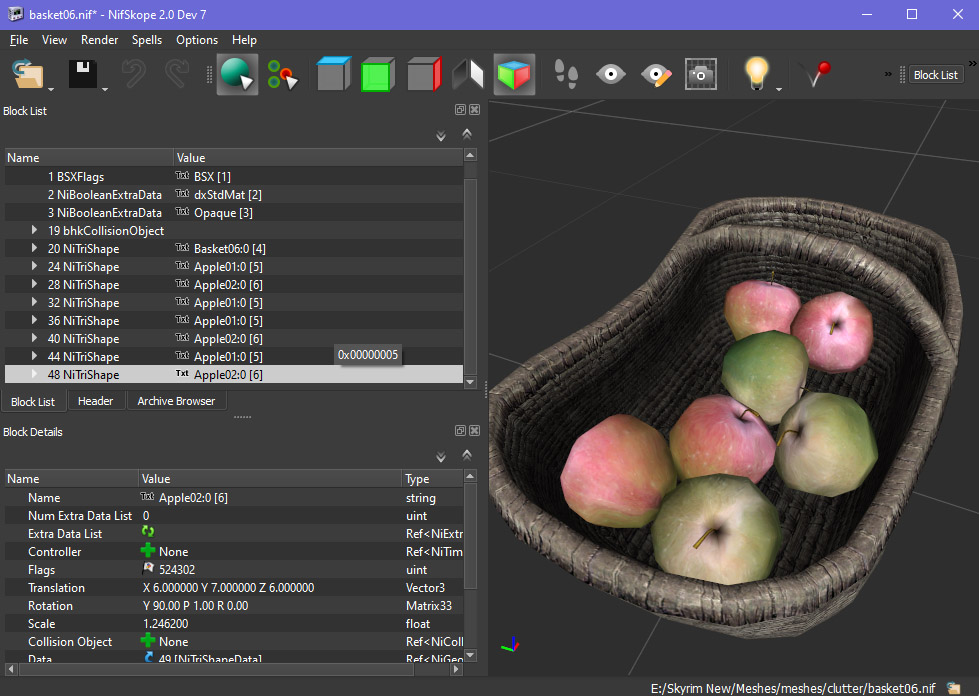
4. Adding Additional Objects
- Repeat this process a few more times, and include the apple02.nif we opened to get some variety in there.
- Copy a few more instances of both apple nifs, and paste them into our basket.
- Using the transform options, arrange your objects around each other within the basket in a way that looks somewhat natural.
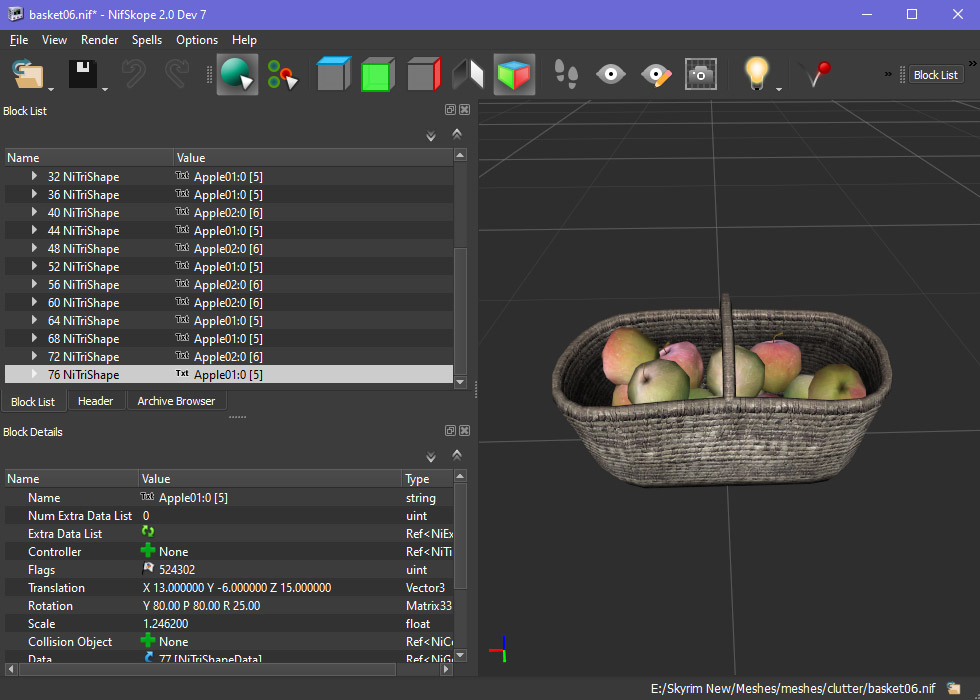
- After filling up the first ‘row’ of the basket, we’ll start adding a second row by increasing the Z axis value in the translation dialogue, so our next set of apples appear to rest on top of the first.
- Once you’re happy with your objects’ arrangement, save your new nif via the File -> Save As… option in nifskope.
- I recommend creating a new folder in your Skyrim’s Data/meshes/ folder, for ease of testing.
The final part of creating our object will be to add collision to it.
To preface this section, I’d like to include a little information about collision. At a base level, collision is what makes it so that characters cannot walk through an object in the world, but also covers a few other things, including whether the item is havok enabled (can bounce around, like a cheese wheel) and the sound the item makes when struck by the player.
Something you’ll want to keep in mind with collision is that it’s a secondary mesh being applied to the object, which will invisibly increase the poly count of the item. For decorative objects like the ones we’re creating here, this has virtually no impact, but for higher poly items (particularly architecture/building kits), creating new collision meshes in a 3d program is advised.
In this tutorial, we’ll just be using the existing mesh data to generate new collision.
Create a Collision Template
To use ChunkMerge to create collision for this object – and other future objects – we need to create a template nif.
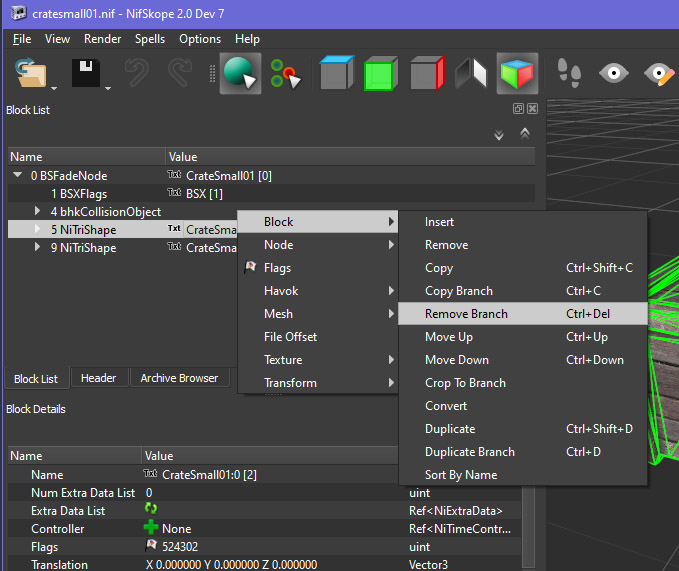
Find another mesh (with collision) that is has similar properties to your item. In this example, we just want a simple static object, so we’ll use a common crate.
Go to your unpacked meshes folder and open:
- meshes\clutter\common\cratesmall01.nif
We’re going to remove everything except the collision from this mesh.
Right click a NiTriShape, go to Block -> Remove Branch. Repeat this for all blocks except for the Root node, BSXFlags and bhkCollisionObject.
Create a new folder somewhere to save your templates, and save this one there.
Give it a name that helps identify what it’s for, e.g. static_clutter_template.nif.
6. Using ChunkMerge
Go to your NifUtilsSuite files that you installed from the start of this guide, and run the program.
The first time you run it, you’ll be prompted to do some setup – you can also access this menu from Options -> Edit on the top bar.
Most settings can be left to their defaults, but you’ll need to set some file paths.
- Nif XML – The location of the “nif.xml” file that comes with your installation of nifskope. Will be in your nifskope installation folder.
- Textures – Path to your textures folder of your Skyrim installation, e.g. steamapps\common\Skyrim\Data\Textures
- Templates – Path to your templates folder we created in the previous step of this guide.
- Default Input/Output – are optional, useful if you keep all your modified nifs in a single folder to set it as the default.
- Nifskope – Path to your nifskope program, nifskope. exe in your nifskope installation folder.
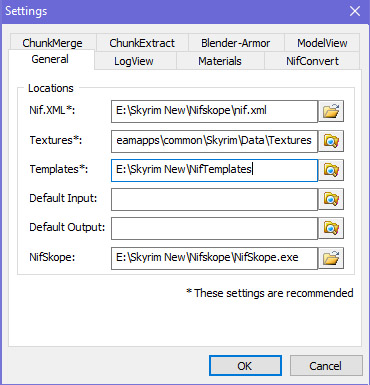
The program may throw an error when saving this even if the file paths are correct. Just double check that they look correct and carry on.
After completing the initial setup, open the ‘ChunkMerge’ tab.
- For both the target and collision file, select the apple basket nif you created. This will tell the program that we want to use the 3d data of this mesh to create the collsion.
- The Template we created should already be selected in the templates dropdown if you set the file path for it.
- Collision Source – select “Mesh Data” to generate collision based on the geometry of our mesh.
- Collision Material determines the sound your object makes when struck. Conveniently, there is a Basket option, but you can select whatever you like.
After finishing your setup, click Add Collision.
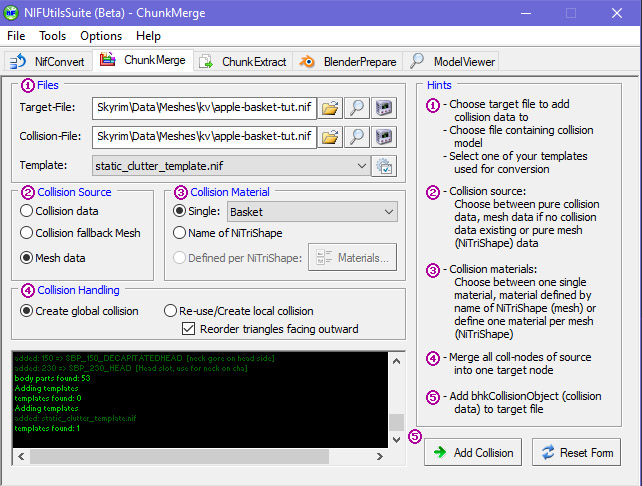
If all goes well, the message area of ChunkMerge should indicate collision data added successfully. Your nif now has collision.

Thank you for this tutorial. Could you enlighten me as to if this method requires some or all of the NifUtilSuite / ChunkMerge prerequisites? I am trying to apply this method for Fallout 3 .NIFs (which I believe should work / be compatible) and my end result is a corrupt .NIF with a jumbled structure. I have followed the tutorial precisely and ChunkMerge throws no errors during the process and reports that the collision data was added successfully. I have not installed the prerequisites as I am not able to the proper Havok SDK and the MS VS2005. Any insight to the prerequisites being required or into why this might be failing for me would be greatly appreciated. Thank you.
Thank you for this tutorial. Could you enlighten me as to if this method requires some or all of the NifUtilSuite / ChunkMerge prerequisites? I am trying to apply this method for Fallout 3 .NIFs (which I believe should work / be compatible) and my end result is a corrupt .NIF with a jumbled structure. I have followed the tutorial precisely and ChunkMerge throws no errors during the process and reports that the collision data was added successfully. I have not installed the prerequisites as I am not able to the proper Havok SDK and the MS VS2005. Any insight to the prerequisites being required or into why this might be failing for me would be greatly appreciated. Thank you.
How i make a custom mesh able to be used an obj for poses ? would help me a lot if you could explian it, i created some obj for creating my own poses too, but idk how to make them abrl to be imported on 3ds max, thanks :3